Developer Quickstart
This guide walks you through integrating Dxtra into your application. You'll get your API credentials, make your first GraphQL query, deploy the Tag Manager for privacy-first analytics, and embed the Transparency Center.
Prerequisites
Before starting, a Business Owner or DPO on your team should have completed the Business Owner Quickstart — your organization needs an active Dxtra account with a generated privacy program.
What you'll accomplish
- Find your developer credentials (DID and Secret Key)
- Create an API key
- Make your first GraphQL query
- Deploy the Tag Manager
- Embed the Transparency Center
Step 1: Get your developer credentials
Sign in to app.dxtra.ai and navigate to Developers in the left sidebar.
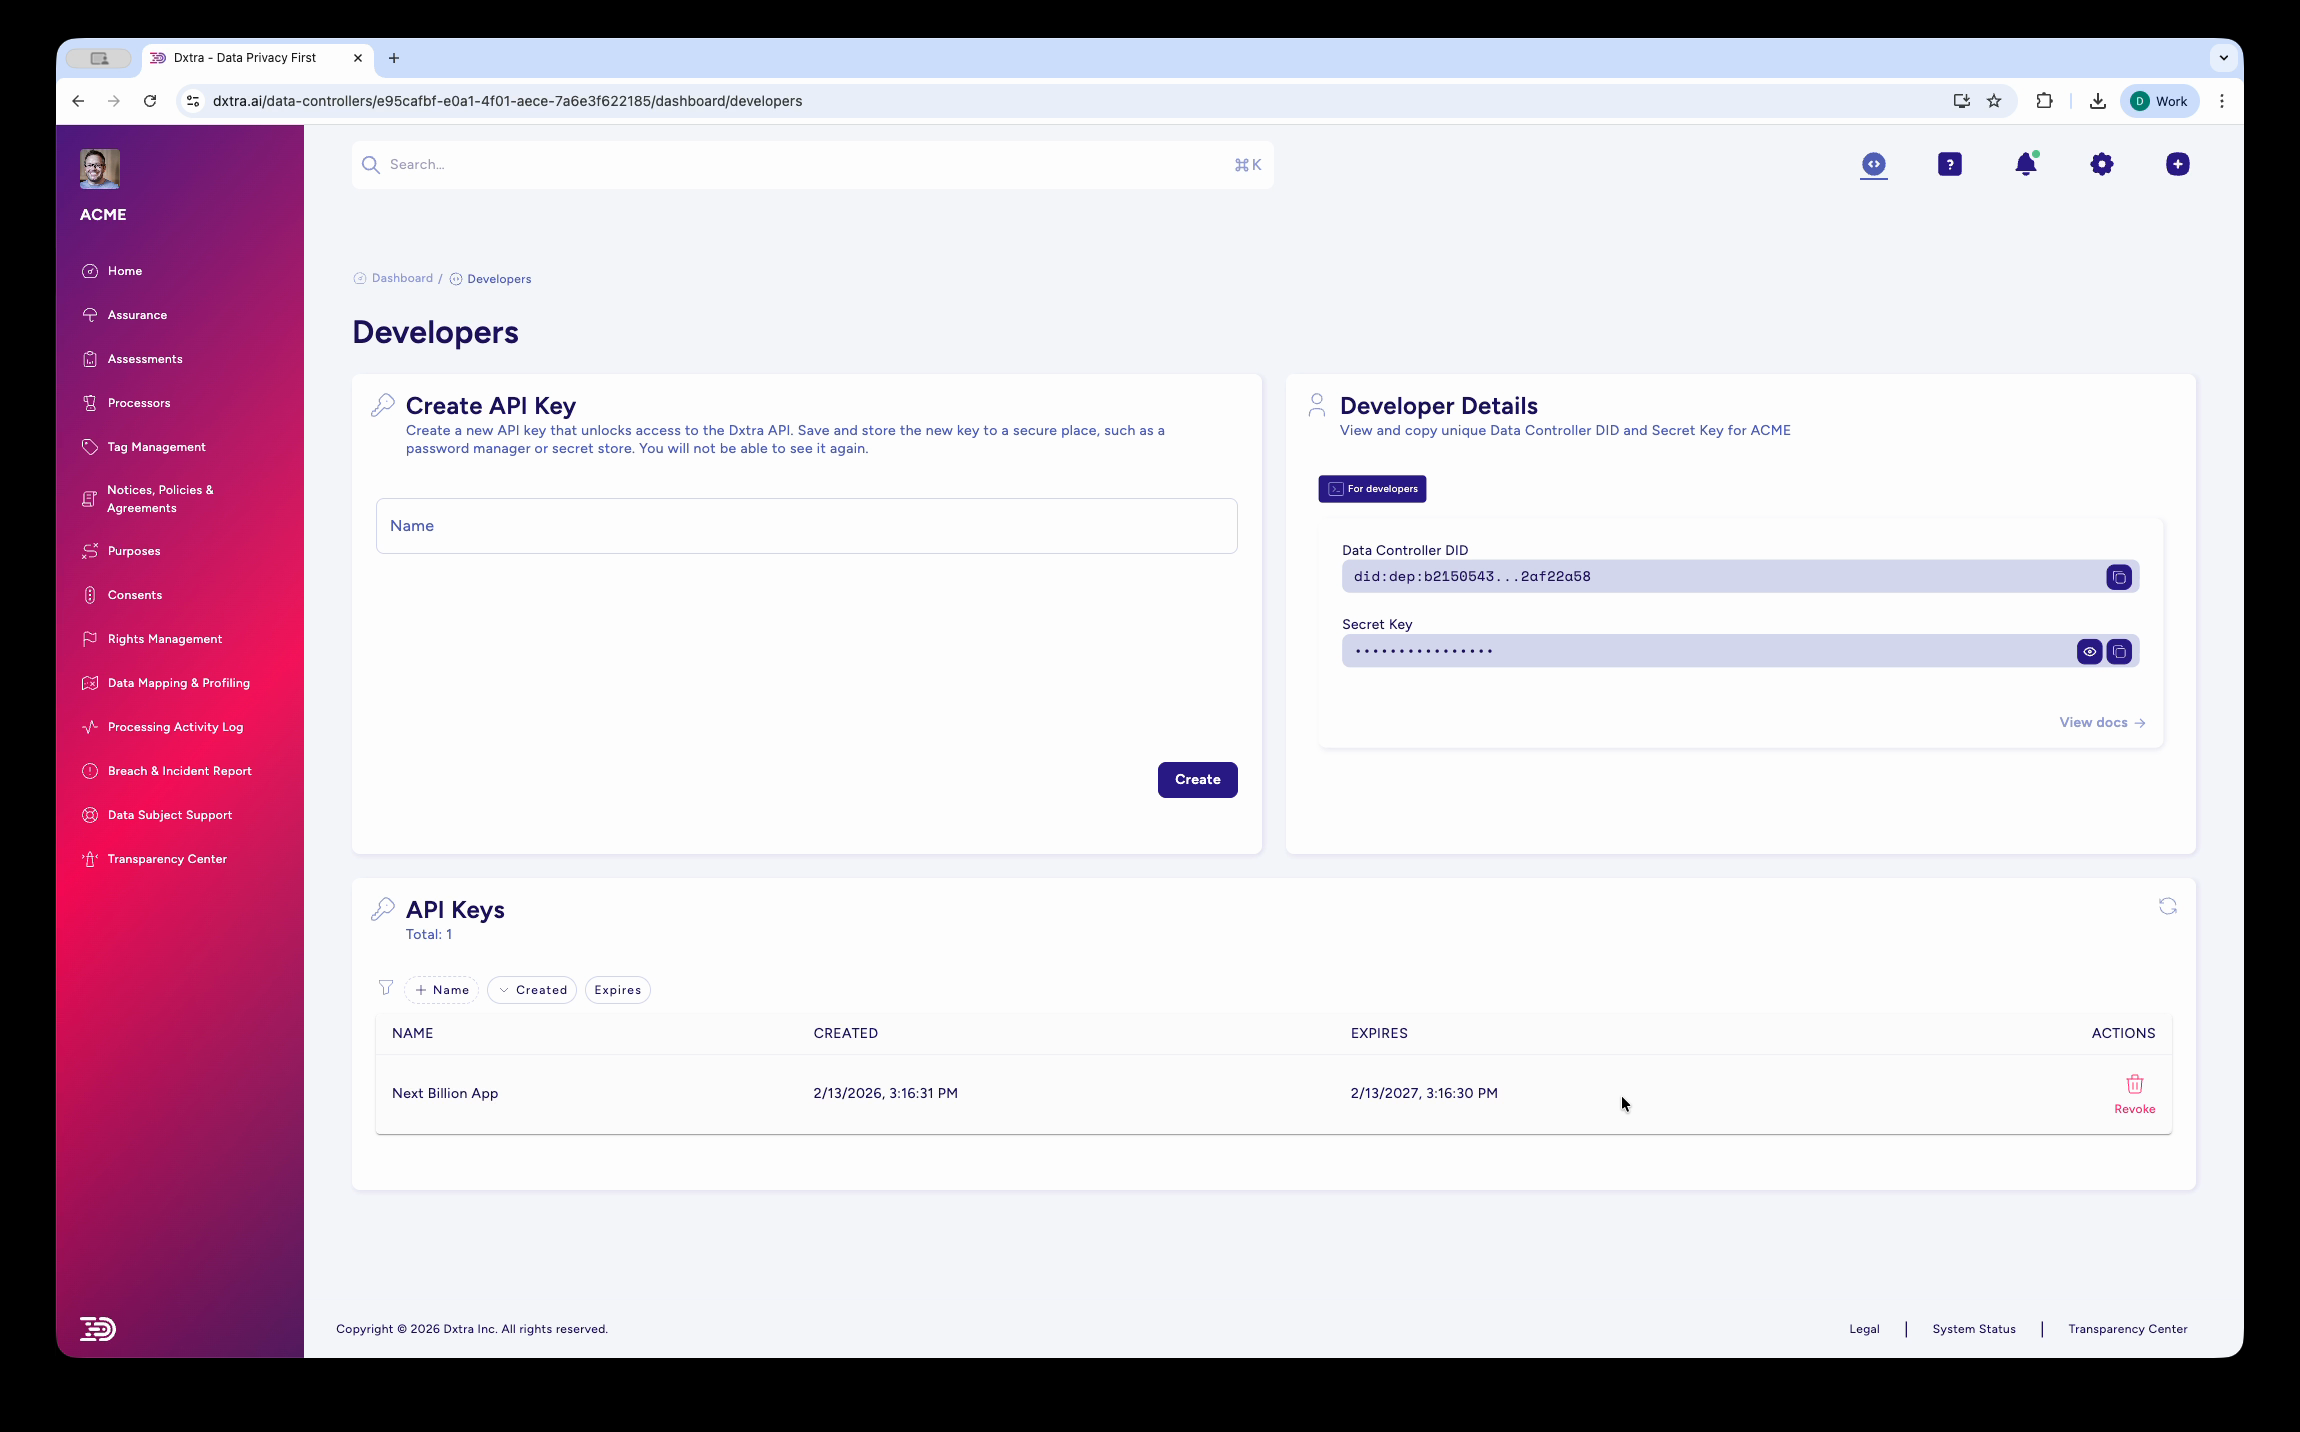
The Developers page shows two essential credentials:
- Data Controller DID
- Your organization's Decentralized Identifier (e.g.,
did:dep:id559843...0u93da08). This is your unique identifier in the Dxtra system. Click the copy button to grab it. - Secret Key
- Your private key for authenticating API requests. Click the eye icon to reveal it, or the copy button to copy it directly. Store this securely — treat it like a password.
Protect your credentials
Never commit your Secret Key or API keys to version control. Use environment variables or a secrets manager (AWS Secrets Manager, GitHub Secrets, HashiCorp Vault, etc.).
Step 2: Create an API key
On the same Developers page, use the Create API Key card:
- Enter a descriptive name for the key (e.g., "Production App", "Staging Environment", "Mobile Client")
- Click Create
- Copy the generated key immediately — you won't see it again
Your new key appears in the API Keys table with its creation date, expiry date (1 year from creation), and a Revoke action.
# Store your credentials as environment variables
export DXTRA_API_KEY="dxtra_key_your_api_key_here"
export DXTRA_SECRET_KEY="your_secret_key_here"
export DXTRA_DID="did:dep:your_did_here"
Step 3: Make your first GraphQL query
Dxtra uses a GraphQL API at https://api.dxtra.ai/v1/graphql. Authentication uses JWT tokens with a 15-minute expiry and role-based access control.
X-Hasura-Role header required
All API requests must include the X-Hasura-Role: user header. This enables role-based access control and ensures queries are executed with the correct permissions for your account.
Using curl
The simplest way to test the API:
curl -X POST https://api.dxtra.ai/v1/graphql \
  -H "Content-Type: application/json" \
  -H "Authorization: Bearer $DXTRA_API_KEY" \
  -H "X-Hasura-Role: user" \
  -d '{
    "query": "query { dataControllers { id title did createdAt } }"
  }'
Expected response:
{
  "data": {
    "dataControllers": [
      {
        "id": "a1b2c3d4-e5f6-7890-abcd-ef1234567890",
        "title": "Acme Corp",
        "did": "did:dep:id559843abc0u93da08",
        "createdAt": "2026-01-15T10:30:00Z"
      }
    ]
  }
}
Using JavaScript
Install a GraphQL client:
Create query-dxtra.mjs:
import { GraphQLClient, gql } from 'graphql-request';

const client = new GraphQLClient('https://api.dxtra.ai/v1/graphql', {
  headers: {
    Authorization: `Bearer ${process.env.DXTRA_API_KEY}`,
    'X-Hasura-Role': 'user',
  },
});

// Fetch your data controllers
const query = gql`
  query GetDataControllers {
    dataControllers {
      id
      title
      did
      createdAt
    }
  }
`;

const data = await client.request(query);
console.log('Data Controllers:', JSON.stringify(data.dataControllers, null, 2));
Run it:
Query data subjects
const subjectsQuery = gql`
  query GetSubjects($controllerId: uuid!) {
    dataSubjects(
      where: { dataControllerId: { _eq: $controllerId } }
      order_by: { createdAt: desc }
      limit: 20
    ) {
      id
      did
      doNotTrack
      globalPrivacyControl
      createdAt
    }
  }
`;

const subjects = await client.request(subjectsQuery, {
  controllerId: 'your-controller-uuid',
});
console.log(`Found ${subjects.dataSubjects.length} data subjects`);
Upsert consent values
const upsertConsent = gql`
  mutation UpsertConsents($input: UpsertDataSubjectConsentsInput!) {
    upsertDataSubjectConsents(input: $input) {
      status
      message
    }
  }
`;

const result = await client.request(upsertConsent, {
  input: {
    dataSubjectId: 'subject-uuid',
    consentValues: {
      marketing: true,
      analytics: false,
      thirdPartySharing: true,
    },
  },
});
console.log('Consent updated:', result.upsertDataSubjectConsents.status);
Explore the full API
For the complete query and mutation reference, authentication details, real-time subscriptions, and error handling, see the GraphQL API Reference.
Step 4: Deploy the Tag Manager
The Dxtra Tag Manager provides privacy-first, server-side, cookie-free analytics with automatic consent enforcement. It tracks page views, sessions, and events while respecting user consent preferences.
Get your Tag Manager script
- Go to Settings → Domains in the dashboard
- Verify your domain (add a DNS TXT record or HTML meta tag)
- After verification, get your Tag Manager installation script from the Tag Manager application
Add to your website
Add the script to the <head> section of every page:
<script
  defer
  src="https://tagmanager-edge.dxtra.ai/tracker.js"
  data-api="https://tagmanager-edge.dxtra.ai"
  data-domain="yourdomain.com">
</script>
That's it. The Tag Manager automatically begins tracking page views and sessions while enforcing consent categories.
Consent enforcement
The Tag Manager recognizes four consent categories and only fires tracking for categories the user has consented to:
- Strictly Necessary — Always active (required for the site to function)
- Performance / Analytics — Site usage and performance metrics
- Functional — Enhanced features and personalization
- Targeting / Marketing — Advertising and marketing tracking
React / Next.js integration
For React or Next.js applications, load the script in your root layout:
// app/layout.jsx (Next.js App Router)
export default function RootLayout({ children }) {
  return (
    <html lang="en">
      <head>
        <script
          defer
          src="https://tagmanager-edge.dxtra.ai/tracker.js"
          data-api="https://tagmanager-edge.dxtra.ai"
          data-domain="yourdomain.com"
        />
      </head>
      <body>{children}</body>
    </html>
  );
}
Server-side and cookie-free
Unlike traditional analytics tools, the Dxtra Tag Manager processes data server-side and does not set cookies. This simplifies compliance with cookie consent requirements in the EU and other jurisdictions.
Step 5: Embed the Transparency Center
The Transparency Center is built as an Atomico web component — a lightweight, framework-agnostic custom element that works with any HTML page or JavaScript framework.
Option A: Web component embed
Add the Transparency Center anywhere on your site:
<script
  type="module"
  src="https://transparencycenter.dxtra.ai/embed.js"
></script>

<transparency-center
  domain="yourdomain.com"
  theme-primary="#1f2937"
  theme-accent="#3b82f6"
  lang="en"
></transparency-center>
Option B: Link to hosted portal
Every Dxtra account gets a hosted Transparency Center URL. Add it to your website footer:
Option C: Custom subdomain
For a branded experience, configure a custom subdomain like privacy.yourdomain.com:
- Go to Settings → Domains in the dashboard
- Add a CNAME record:
privacy.yourdomain.com → transparencycenter.dxtra.ai - Dxtra provisions an SSL certificate automatically
Customization options
The web component accepts these attributes:
| Attribute | Type | Description |
|---|---|---|
domain | string | Your verified domain (required) |
theme-primary | hex color | Primary brand color |
theme-accent | hex color | Accent/highlight color |
lang | string | Language code (en, de, fr, es, etc.) |
sections | comma-separated | Visible sections: practices,rights,contact,requests |
Set up webhooks (optional)
Webhooks let your application react in real time to privacy events — consent changes, data subject requests, breach reports, and processing activity updates.
Create an endpoint
// Node.js / Express
import crypto from 'crypto';
import express from 'express';

const app = express();
app.use(express.raw({ type: 'application/json' }));

app.post('/webhooks/dxtra', (req, res) => {
  // Verify the webhook signature
  const signature = req.headers['x-dxtra-signature'];
  const computed = crypto
    .createHmac('sha256', process.env.DXTRA_WEBHOOK_SECRET)
    .update(req.body)
    .digest('hex');

  if (!crypto.timingSafeEqual(Buffer.from(signature), Buffer.from(`sha256=${computed}`))) {
    return res.status(401).json({ error: 'Invalid signature' });
  }

  const event = JSON.parse(req.body);

  switch (event.type) {
    case 'consent.granted':
      console.log('Consent granted:', event.data.dataSubjectId);
      break;
    case 'consent.withdrawn':
      console.log('Consent withdrawn:', event.data.dataSubjectId);
      break;
    case 'dsr.created':
      console.log('Rights request:', event.data.requestType);
      break;
    case 'breach.reported':
      console.log('Breach reported:', event.data.incidentId);
      break;
  }

  res.status(200).json({ received: true });
});

app.listen(3000);
Register the webhook
- Go to Settings → Webhooks in the dashboard
- Click Add Webhook
- Enter your endpoint URL (e.g.,
https://yourapp.com/webhooks/dxtra) - Select the events you want to subscribe to
- Copy the signing secret and store it as
DXTRA_WEBHOOK_SECRET
Webhooks are delivered to conduit.dxtra.ai and use HMAC-SHA256 signature validation. Failed deliveries are retried with exponential backoff.
Webhook event catalogue
For the full list of webhook events, payload schemas, and retry behavior, see Webhooks Reference.
What you just did
- Located your developer credentials (DID and Secret Key) on the Developers page
- Created an API key for authenticating requests
- Made your first GraphQL query to the Dxtra API
- Deployed the Tag Manager for privacy-first analytics
- Embedded the Transparency Center into your application
- (Optional) Set up webhooks for real-time event handling
Next steps
- Explore the full API
- The GraphQL API Reference documents every query, mutation, and subscription with example requests and responses.
- Build custom integrations
- Use Dxtra Custom Functions to write serverless code for bespoke integration logic.
- Automate data subject requests
- Integrate DSRR handling into your application with the DSRR Automation guide.
- Connect pre-built integrations
- Dxtra has pre-built connectors for Shopify, Stripe, HubSpot, Mailchimp, Google Analytics, and more. See Integrations.
- Monitor processing logs
- Query and audit processing activity logs through the API. See Processing Activity Logs.
Troubleshooting
- "Unauthorized" or 401 errors
- Verify your API key is correct, hasn't expired, and that you're using the right environment (development vs. production). API keys expire 1 year after creation.
- CORS errors
- The Dxtra API supports CORS. Ensure your origin domain is listed under Settings → Domains in the dashboard.
- Tag Manager not loading
- Confirm your domain is verified in Settings → Domains. Check your browser's developer console for network errors. The script loads asynchronously and won't block page rendering.
- Webhook not firing
- Verify your endpoint is publicly accessible, returns a 2xx status code, and check the delivery logs in Settings → Webhooks → Logs.
Not legal advice
AI-generated content does not constitute legal advice. Consult a qualified legal professional for advice specific to your jurisdiction and business context.